

Did They Have Rectangular Cake Pans In 1840?
Every editorial production is independently selected, though we may be compensated or receive an affiliate commission if you purchase something through our links. Ratings and prices are accurate and items are in stock as of time of publication.
The Taste of Domicile Test Kitchen shows you how to set your block pan. Say goodbye to cakes that stick.
Many factors go into making the perfect cake—similar whipping egg whites to merely the right peak to achieve the perfect springy bake. One of the simplest steps is also the well-nigh of import: properly preparing your cake pan. If your pan isn't adequately greased and lined, your cake will definitely stick. Cipher'due south sadder than spoiling a gorgeous cake past turning the pan over and watching every bit only one-half comes out and the balance stays backside.
Our Test Kitchen shares the secrets of how to grease a cake pan the proper way. (Spoiler alarm: information technology takes more than just grease.)
Not sure what kind of block to make? Check out our favorite cake recipes, here.
How to Grease a Cake Pan
You lot'll need:
- Cake pan (check your recipe for the proper size and type)
- Butter, shortening, cooking spray, or a cooking spray with flour in it, such equally Baker's Joy
- Flour
- Parchment paper

Step 1: Grease the pan
Tear a square of parchment paper (or a slice of paper towel in a pinch). Put a generous dollop of grease on one side and go a grip on the opposite side, keeping your hand make clean. Smear grease over every inch of the inside of the pan: the bottom, sides and corners. Be generous!
If you're using a spray, this step is elementary: just liberally spray all over the pan. If you lot've got a spray with flour in it, y'all can skip ahead to No. 3.
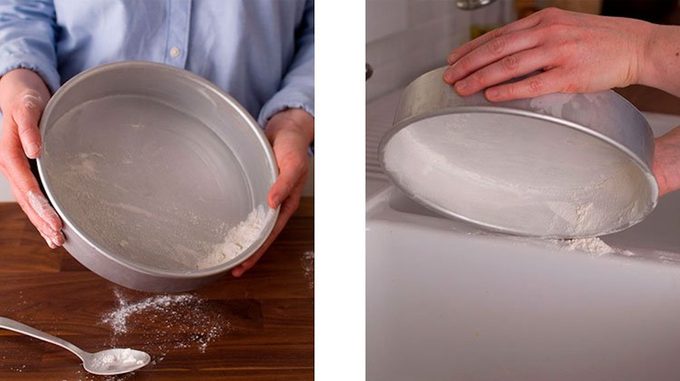
Step 2: Flour the pan
Flour will stick to the grease adding an extra layer of protection between pan and cake. Flouring is satisfying but information technology tin can get messy; we suggest wearing an frock and working over the sink.
Accept a spoonful of flour and agree it evenly over the pan. Shake your wrist to send the flour showering downward into the pan. It probably won't disperse very evenly at this point; don't worry. Take the pan over to your sink and tilt information technology back and forth, hitting the lesser or sides equally needed to shake upwards drifts of flour and ship them to sparser areas. One time your pan looks almost evenly covered, plow it upside down and gently rap the bottom to shake out whatever excess.

Step 3: Line the pan
Lining the pan is a pace that can experience unnecessary after y'all've greased it already. But trust the states, it'due south worth it.
(Note: Some recipes call for just greasing and flouring a pan, while some call for greasing and lining. You can follow your recipe, or do all of the steps hither to be extra sure your cake won't stick.)
The merely real challenge in lining a pan is cutting paper to fit. You tin buy pre-cutting parchment circles, or grab some regular parchment paper and a pair of sharp pair of scissors.
You can lay the parchment apartment under the pan. Trace around the pan, and cut a circumvolve slightly smaller than your line.

Or endeavour this nifty magic fob. Stretch a piece of parchment long enough to fit the pan. Cut, fold in half, and then fold in half again. Fold into a triangle (it won't be perfect), keeping the folded sides together. Fold into another triangle, again with the folded sides together. Tip your pan over, gear up the point at the eye of the bottom. Hold it at that place and cut off the extra length. When you unfold the paper, you'll accept a circle the size of your pan.
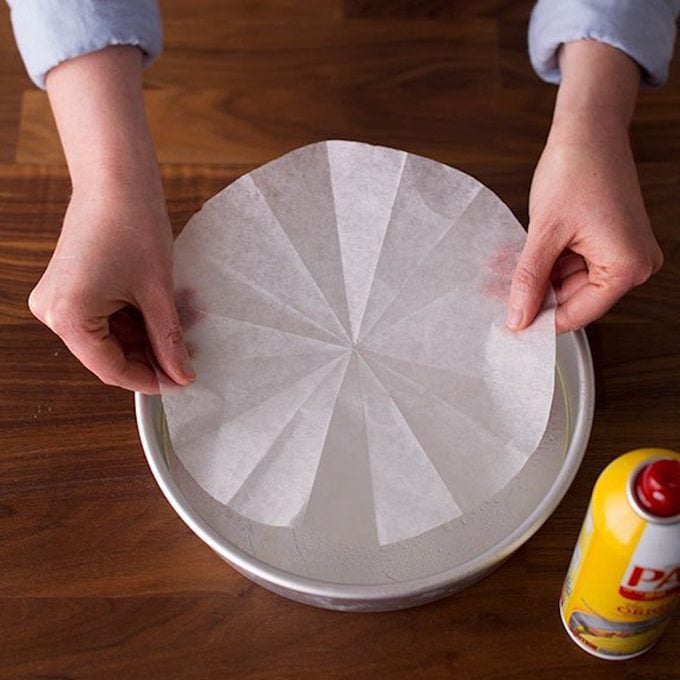
Step 4: Grease (and flour) the lining
Yep, you'll desire to grease the lining. Follow steps ane and 2.
Step 5: Triumph in your make clean cake release!
After you bake, gently plow the pan over to release the block. It will sideslip out easily. Pull off the parchment circle smoothly. Your double greasing will come in handy here, as you won't lose a scrap of crust.
Use This Technique for These Recipes
Sandy's Chocolate Cake
Years ago, I collection 4-1/2 hours to a cake contest, holding my entry on my lap the whole way. But it paid off. One bite and you'll come across why this velvety beauty was named the best chocolate cake recipe won starting time prize. —Sandra Johnson, Tioga, Pennsylvania

Royal Pecan Cake
This recipe truly lives upwards to its name. The pecan-dotted cake is stacked in three layers, and made-from-scratch frosting is the crowning bear on.—Karen R. Jones, Claypool, Indiana

Malted Chocolate & Stout Layer Cake
If you lot desire a St. Patrick's Day dessert that volition take the cake, look no further! The rich chocolate block is incredibly moist and has a nice malt flavour that'southward perfectly complemented by the Irish gaelic cream frosting. —Jennifer Wayland, Morris Plains, New Jersey

Best Ruby Velvet Cake
It's just not Christmas at our house until this festive cake appears. This is unlike from other ruby-red velvet cake recipes I've had; the icing is as lite as snow. —Kathryn Davison, Charlotte, North Carolina

Chocolate Spice Block with Caramel Icing
I found this recipe back in the late '80s and knew it was a special cake. The caramel icing can be a little tricky because yous have to piece of work quickly, but it'due south so worth it! —Mariann James, Ferguson, Missouri

Chocolate Hazelnut Torte
Most cake recipes feed a crowd. So we came upwards with this elegant little cake that serves six. That's enough for two…with just the right amount of leftovers! —Taste of Home Examination Kitchen

Black Walnut Layer Block
My sister gave me the recipe for this beautiful cake years ago. The thin layer of frosting spread on the outside gives it a chic modern look. —Lynn Glaze, Warren, Ohio

Moist Chocolate Cake
This chocolate cake recipe with java reminds me of my grandmother because it was one of her specialties. I bake information technology often for family parties, and it always brings back fond memories. The cake is light and airy with a succulent chocolate taste. This recipe is a keeper! —Patricia Kreitz, Richland, Pennsylvania

Butter Pecan Layer Cake
Pecans and butter give this cake the aforementioned irresistible flavor as the popular butter pecan water ice cream flavor. —Becky Miller, Tallahassee, Florida

Reddish Nut Cake
My grandmother made up this recipe for her children. Using Ozark-grown cherries and walnuts, she invented ane they all liked. Granny always used cream from the dairy farm almost her home, but the half-and one-half works well and is easier to find. —Diana Jennings, Lebanon, Missouri

Favorite Coconut Block
When I demand an impressive dessert for a special occasion, this is the recipe I turn to. My guests are glad I exercise! —Edna Hoffman, Hebron, Indiana

Strawberry Mascarpone Cake
Don't allow the number of steps in this recipe fool y'all —information technology'south easy to assemble. The cake bakes up loftier and fluffy, and the berries add a fresh fruity flavor. Foam cheese is a good substitute if you don't accept mascarpone cheese handy. —Ballad Witczak, Tinley Park, Illinois

Marvelous Marble Block
Pound block and chocolate make the best marble block. — Ellen Riley, Birmingham, Alabama

Pink Lemonade Stand Cake
If you dearest a moist and flossy cake, this ane's for you. The lemon juice and lemonade give the layers a tangy, citrusy touch, and the foam cheese frosting with sprinkles makes information technology extra pretty. —Lauren Knoelke, Milwaukee, Wisconsin

Carrot Block with Pecan Frosting
My husband constantly requests this homey, old-fashioned version of carrot cake. The frosting is still tasty even without the pecans. —Adrian Badon, Denham Springs, Louisiana

Chocolate Block with Chocolate Frosting
I once sent this rich chocolate cake to my kids' teachers, and information technology vanished, so I had to make another one. (Who swipes a whole cake?) —Megan Moelbert, Springville, NY

Lemon Ricotta Block
This lemon ricotta cake recipe is a family unit gem that was passed downwardly from my grandmother and female parent. Garnished with shaved lemon zest, the moist iv-layer cake is the perfect dessert when you want to impress. —Nanette Slaughter, Sammamish, Washington

Coconut Italian Cream Cake
I'd never tasted an Italian cream block before moving to Colorado. Now I broil for people in the expanse, and this beauty is i of my most requested treats. —Ann Bush, Colorado Urban center, Colorado

Frosted Chocolate Block
This recipe is my mother's oldest and near popular chocolate cake recipe. I ever idea it should have a fancier name, but this is what she called it. Mom would say a fancy name would non make it sense of taste better. —Beth Bristow West Plains, Missouri

Pineapple Carrot Cake
This moist cake with foam cheese frosting is the best I've ever eaten. Information technology's so uncomplicated, too, because information technology uses two jars of babe food instead of fresh carrots that demand to be grated. —Jeanette McKenna, Vero Beach, Florida

Cranberry Layer Cake
I adapted a Bundt block recipe to create this layer cake. Cranberries, walnuts and homemade frosting make it taste so delicious that you'd never estimate information technology starts with a convenient cake mix. —Sandy Burkett, Galena, Ohio

Mama's Spice Block
Whenever I go a peckish for a tasty onetime-fashioned treat, I make this cake. Nifty cooks in my family have been baking information technology for generations, and their families take been enjoying the wonderful spice season and rich frosting. —Nancy Duty, Jacksonville, Florida

Come-Home-to-Mama Chocolate Block
You'll spend less than a half hour whipping up this cure-all cake that starts with a mix. Sour cream and chocolate pudding get in rich and moist, and chocolate, chocolate and more chocolate get in decadent comfort food at its finest. —Gustatory modality of Dwelling Examination Kitchen

Lemon Layer Cake
This citrusy cake with a luscious foam cheese frosting volition garner plenty of adulation. The season, a duet of sweet and tangy notes, really sings. —Summer Goddard, Springfield, Virginia

Hummingbird Cake
This impressive hummingbird cake is my dad's favorite, so I e'er make information technology for his birthday. Information technology makes a memorable dessert for any commemoration and is lovely with a summertime meal. —Nancy Zimmerman, Greatcoat May Court House, New Jersey

Pumpkin Pie Cake
No one will gauge this showstopper dessert with luscious cinnamon frosting starts with a mix! It's a year-round favorite. —Linda Murray, Allenstown, New Hampshire

Three-Layer Chocolate Ganache Block
This corrupt triple-layer dazzler is pure chocolate indulgence. The block layers tin can be frozen prior to final assembly; in fact, they're easier to work with when frozen. —Kathleen Smith, Overland, Missouri

Southern Lane Block
I just love this southern-style dessert, and and then do dinner guests. With pecans, cherries and raisins in the filling and topping, this version reminds me of a fruitcake—simply and then much better! —Mabel Parvi, Ridgefield, Washington

Bluish-Ribbon Cherry-red Velvet Cake
This 2-layer beauty features a hitting red interior. Information technology calls for more cocoa than most red velvet cakes, making information technology extra chocolaty. Feel free to change the color of the nutrient coloring to suit the occasion. This recipe won a blue ribbon in the holiday cake partition at the 2006 Alaska State Off-white. I think this cake will exist a winner in your firm, also! —Cindi DeClue, Anchorage, Alaska

Competition-Winning Chocolate Irish potato Cake
I won grand champion honors in a spud festival baking competition with this moist chocolate cake. The icing recipe can exist doubled if you have a existent sweet tooth. —Catherine Hahn, Winamac, Indiana

Maple Walnut Cake
This maple-flavored block with candy-coated walnuts honors my grandpa, who used to brand maple syrup. —Lori Fee, Middlesex, New York

Cherry Cola Block
Crimson cola and marshmallows make a zippy chocolate dessert that is scrumptious topped with vanilla ice foam. — Cheri Mason, Harmony, North Carolina

Pumpkin Cake with Whipped Cinnamon Frosting
My mom made this for me, and ane seize with teeth can completely take me back to my childhood. Y'all can easily catechumen it into a great carrot cake recipe: just use grated carrots in place of pumpkin and add raisins. —Melissa Pelkey Hass, Waleska, Georgia

Butterscotch Cake
I get lots of compliments and recipe requests whenever I make this eye-catching cake. The filling is similar to German language chocolate cake. —Judy Lamon, Louisville, Tennessee

Kokosnoot Chiffon Cake
Toasted kokosnoot adds visual appeal to this alpine and impressive cake. With an airy texture and heavenly coconut-ginger flavor,it's a lovely end to meals throughout the year.

Brooklyn Blackout Cake
If you honey chocolate, you will Dearest this cake. I found this recipe when looking for a special cake to make my chocolate-loving daughter-in-law's altogether. Be sure to give the pudding and the cake plenty fourth dimension to cool or the end results will be disappointing. —Donna Bardocz, Howell, Michigan
Source: https://www.tasteofhome.com/article/how-to-grease-a-cake-pan-the-right-way/
Posted by: jonesadeaske71.blogspot.com
0 Response to "Did They Have Rectangular Cake Pans In 1840?"
Post a Comment